
Setting up VLESS in Marzban
Marzban is a panel for creating connection configs to proxies of various protocols such as VLESS, VMESS, Trojan, Shadowsocks. In this instruction, we will consider connection via VLESS protocol.
Creating a personal proxy in a few minutes
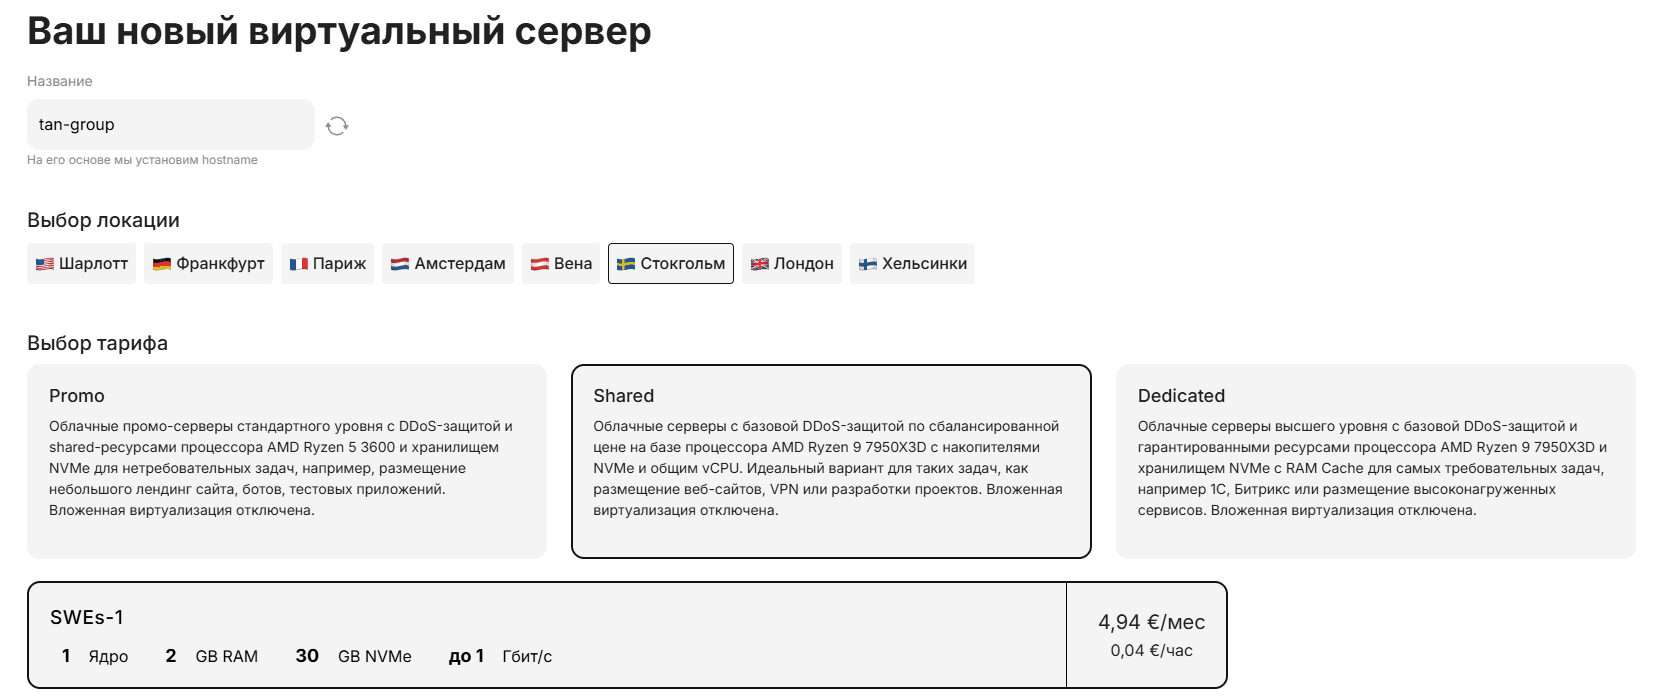
_ To start, we will prepare a server with the Marzban package installed. This can be done ** in two different ways**. You can choose the most suitable one for you._
Purchase of the required tariff with a pre-installed Marzban
To do this, we will need to buy the necessary server in the desired location. In our case, this will be the base tariff SWEs-1 in Sweden.\
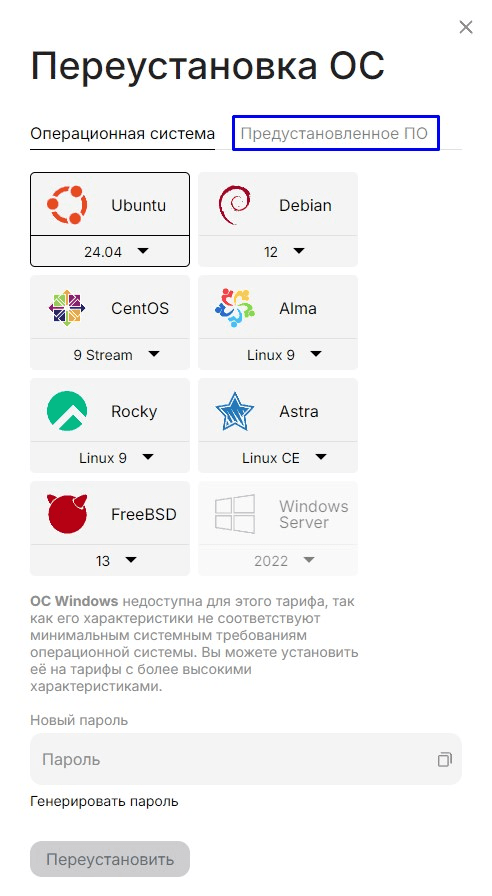
Go to the "Pre-installed Software" section\
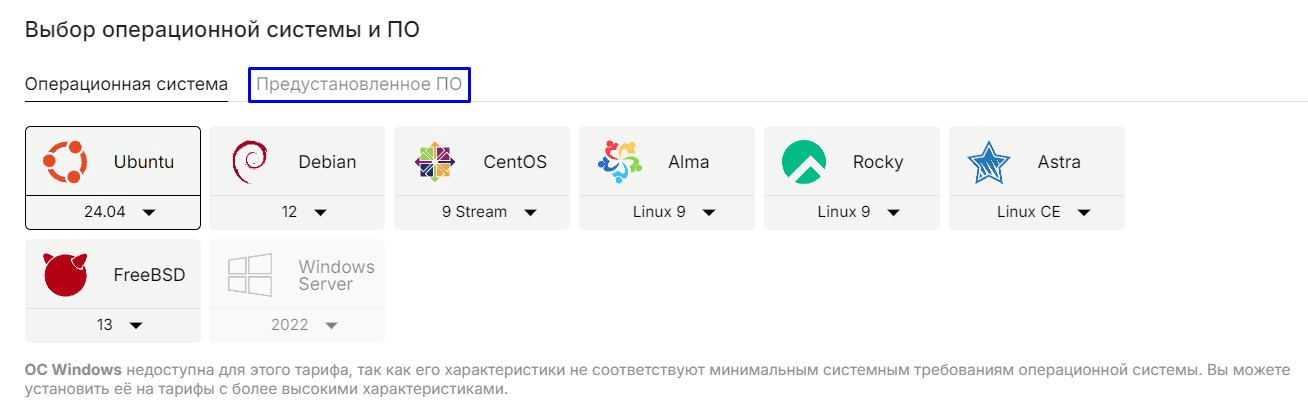
In the pre-installed software, select the ** Marzban script**
The OS will be installed according to the specified OS in the preinstalled software script, in this case Ubuntu 22.04 + Marzban will be installed.
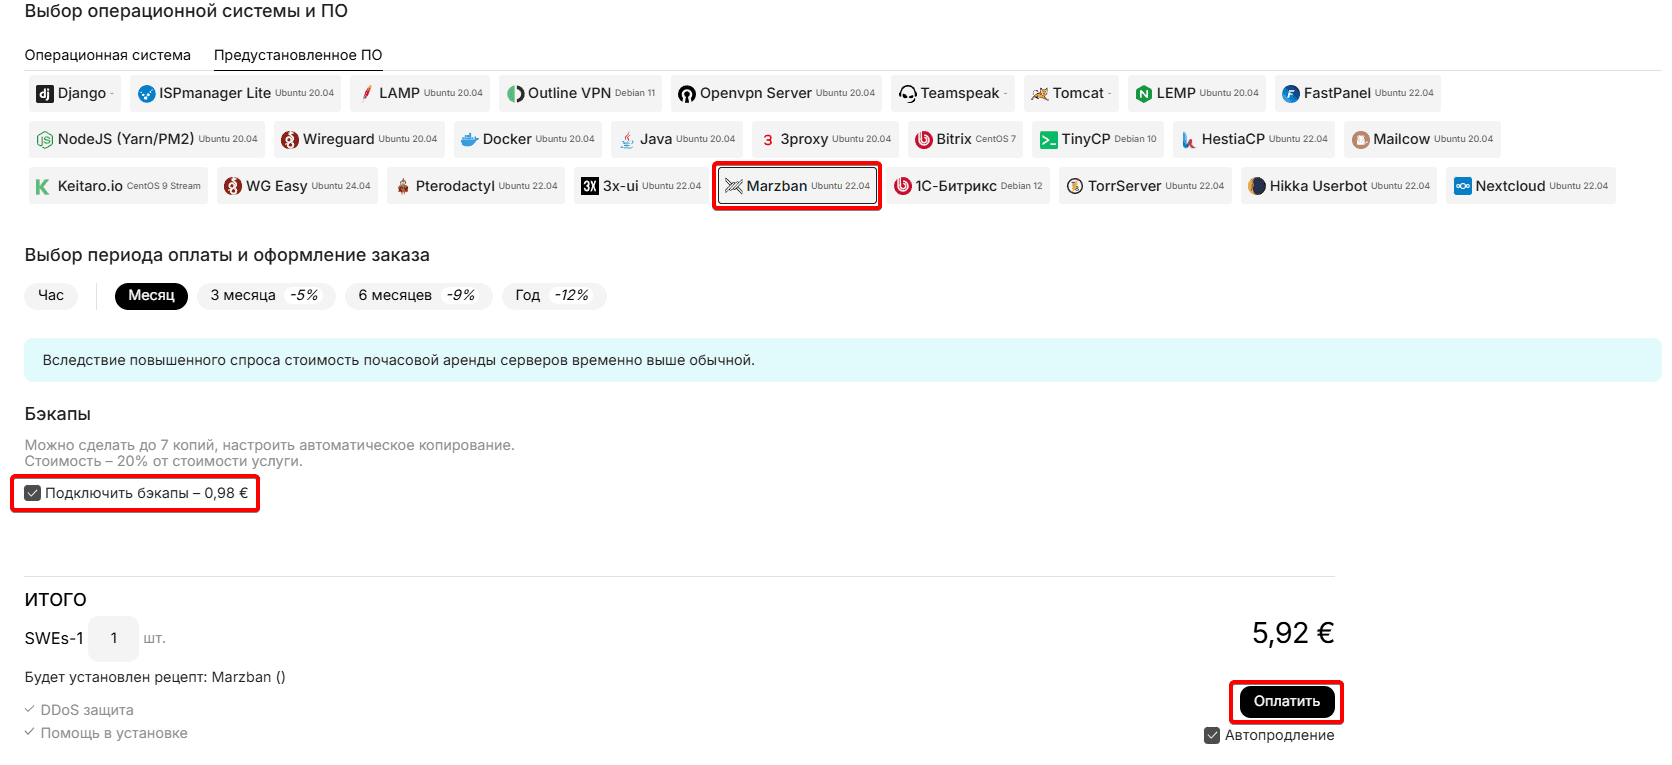
Select the desired server rental period, if necessary, disable the Backups service and click the "Pay" button:

Great. Now the ordered server will be activated with the installation of the OS and the Marzban script on it, after which the server will be ready to configure the panel and create a configuration for connection. We will talk about this in detail ** in paragraph 2.**
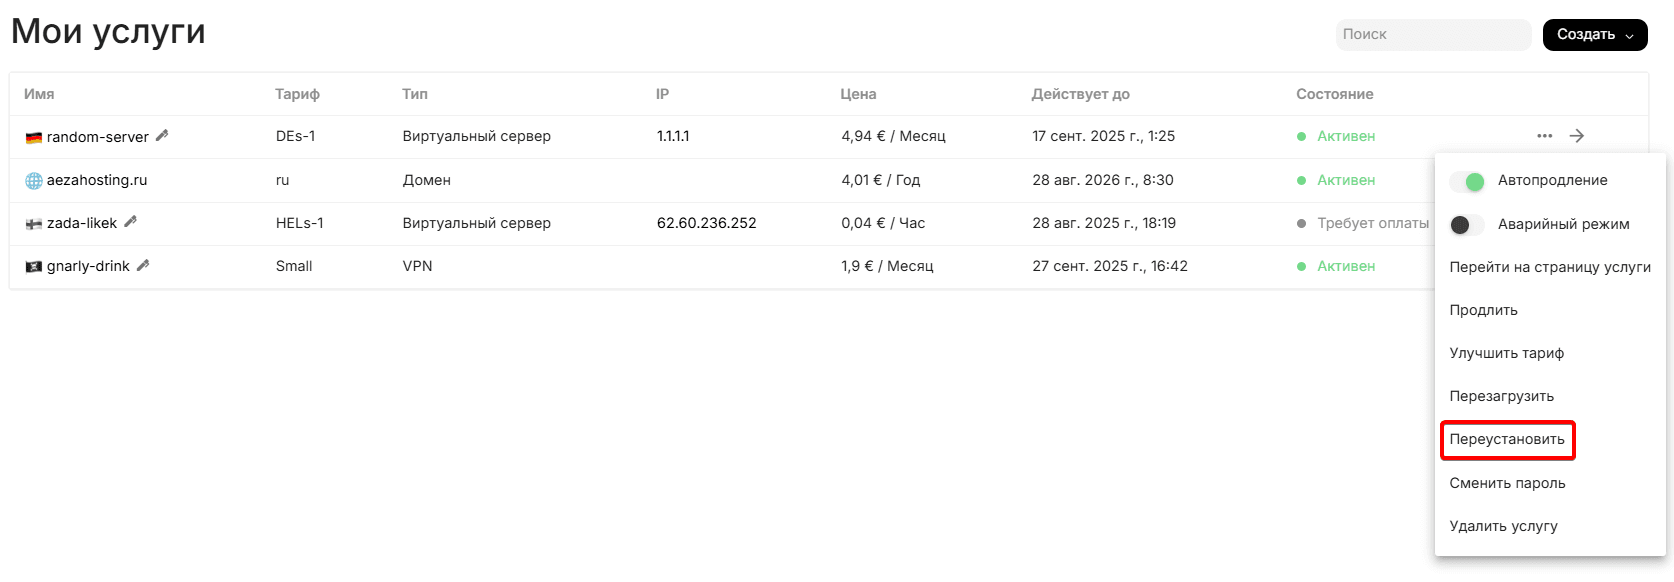
Reinstalling an existing server by installing the Marzban script
Let's go to the services section and click the colon icon to the right of the already purchased server, select reinstall
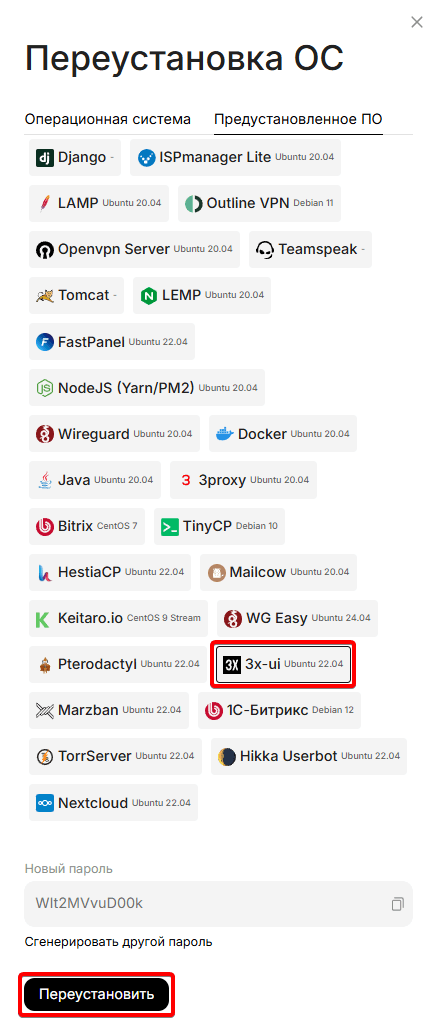
You will see this menu, where we will go to the "Pre-installed Software" tab.\
Select the Marzban script, copy the new password from the server, click reinstall
The OS will be reinstalled according to the specified OS in the preinstalled software script, in this case Ubuntu 22.04 + Marzban will be installed.
Great. Now the OS on the server will be reinstalled with the installation of the Marzban script, after which the server will be ready to configure the panel and create a configuration for connection. We will talk about this in detail ** in paragraph 2.**
You can also contact support for help installing this software.
2. Getting login information for Marzban
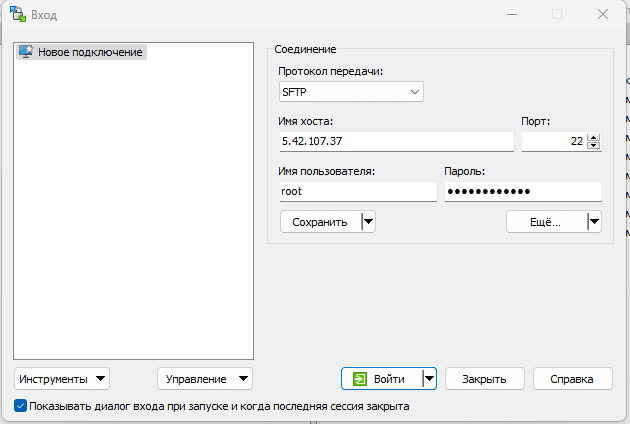
Connect to the server via WinSCP (or another convenient SFTP client) and specifying the IP, login and password from your personal account, or an email from your mail.\
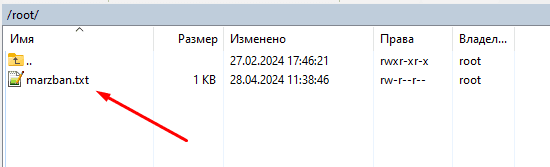
The file must be opened in the root directory "marzban.txt " with data for connection to the Marzban control panel:
Due to the latest security updates, there are two options for accessing the panel:
1. Through an SSH Tunnel
2. By linking the domain name to the server and obtaining an SSL certificate
Consider both cases
Login to the panel via SSH Tunnel
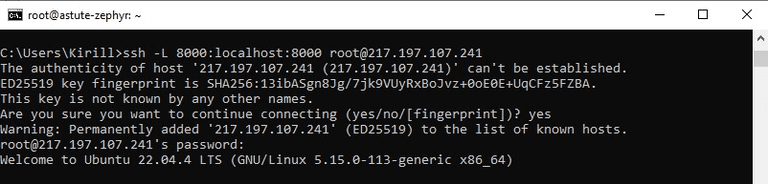
To log in to the dashboard without using an SSL certificate and domain name, we need to create a tunnel. The tunnel creation command is constructed as follows: ssh -L [local port]:[remote host]:[remote port] [user]@[server address]
In our case, the command looks like this:
ssh -L 8000:localhost:8000 root@server IPFor Windows systems, the command must be entered at the command prompt (cmd).
For Linux and macOS - in the terminal.
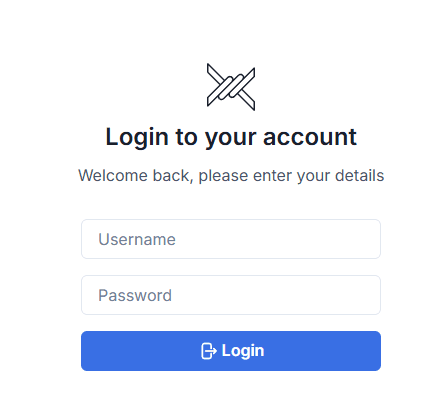
After entering this command, confirm the connection ** by entering "Yes" and then enter the password from the server **. After connecting to the server, access to the panel should appear from your device's browser.
The panel should now be available in the browser via the link: http://127.0.0.1:8000/dashboard /
Then you can proceed to next step
Way to access the panel from mobile devices
We will need the Termius - Android https://apps.apple.com/ru/app/termius-terminal-ssh-client/id549039908 - IOS and macOS
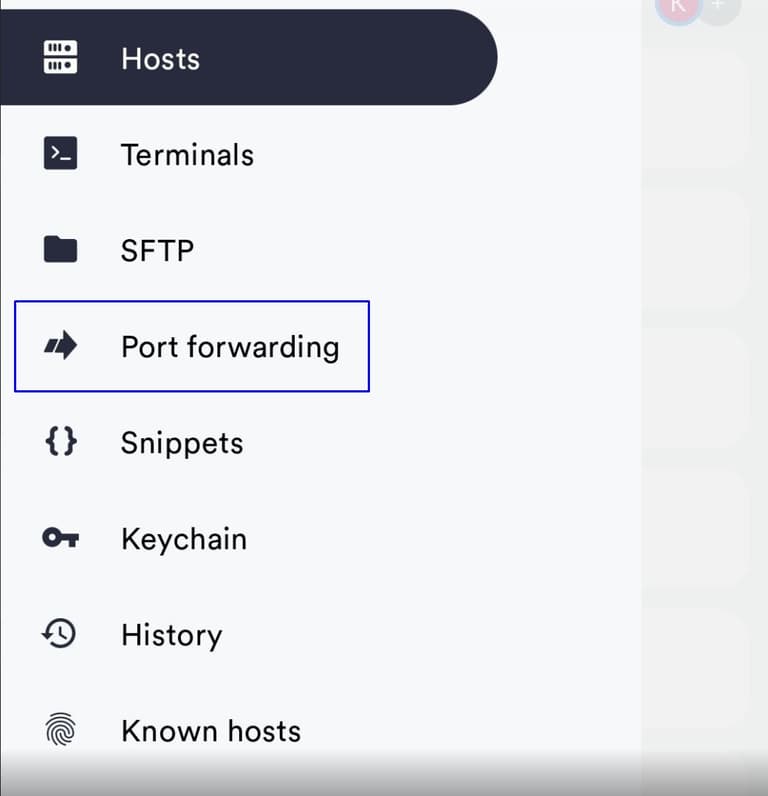
After installation, go to it and log in to the server via SSH for the first time, then go to the main menu and select the "Port Forwarding" tab
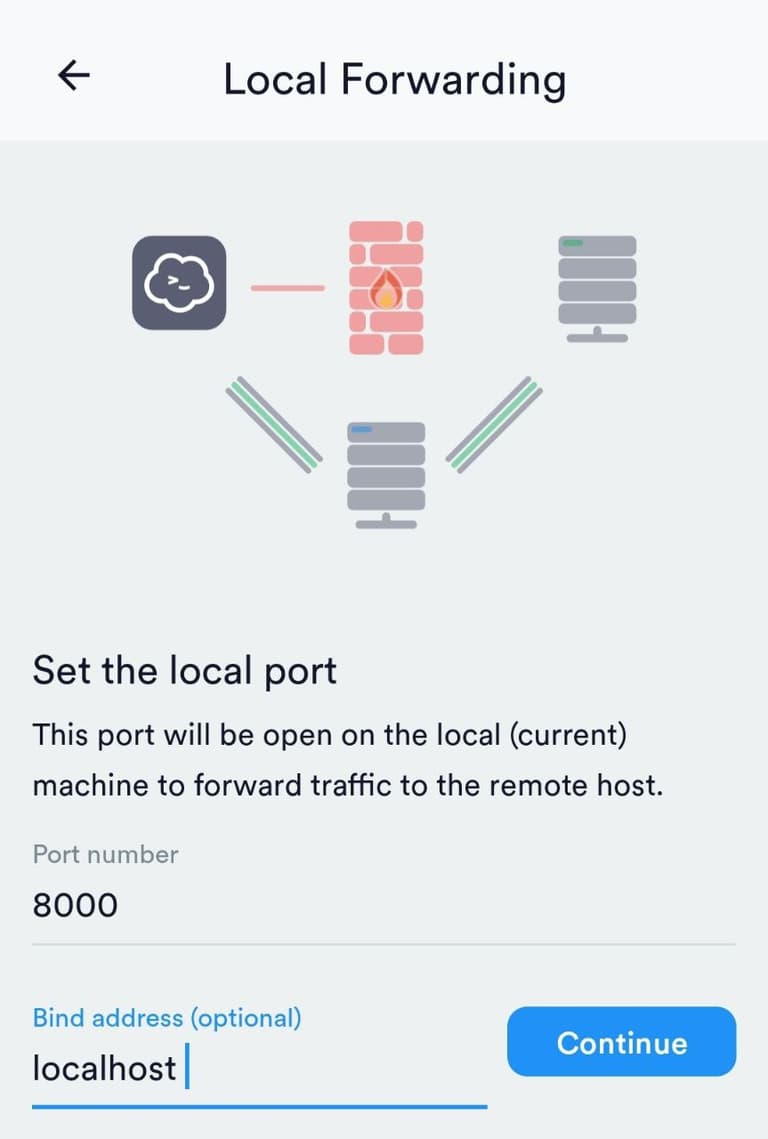
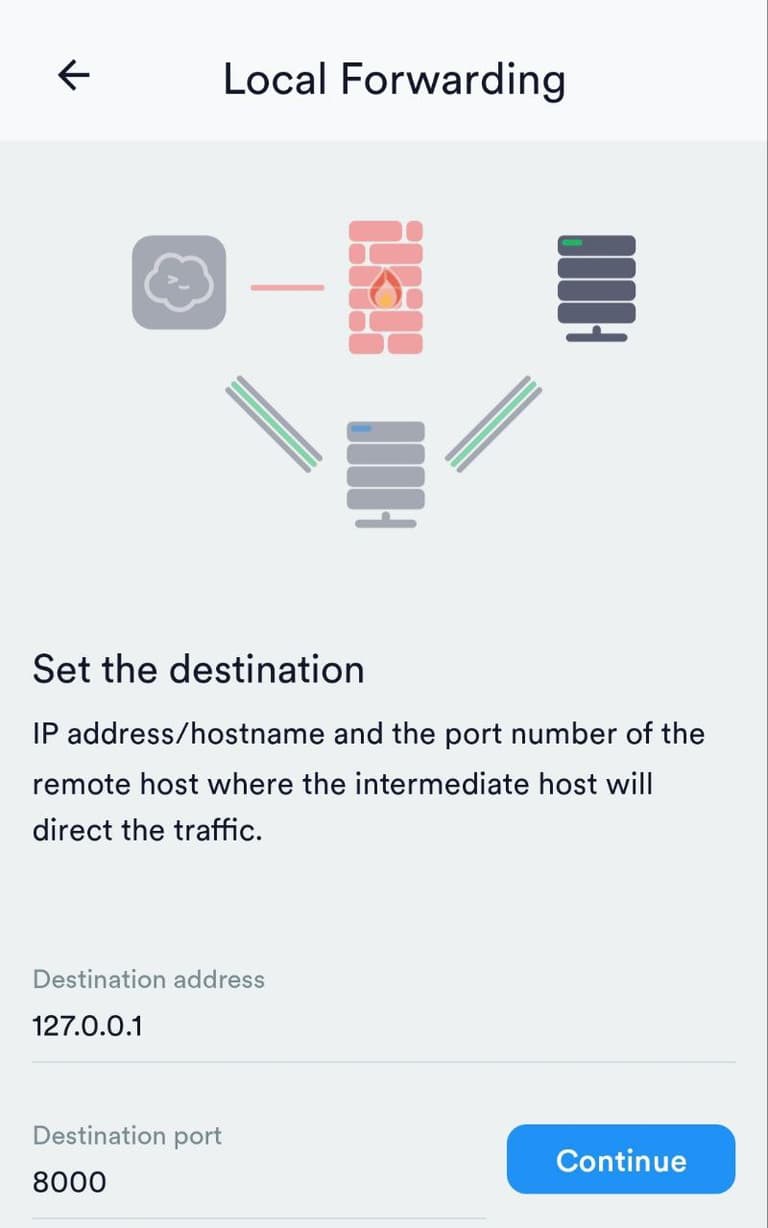
In the lower corner, click "+", then select Local and click Continue
 |  |
|---|---|
Select the server from the list, and then specify the following data:
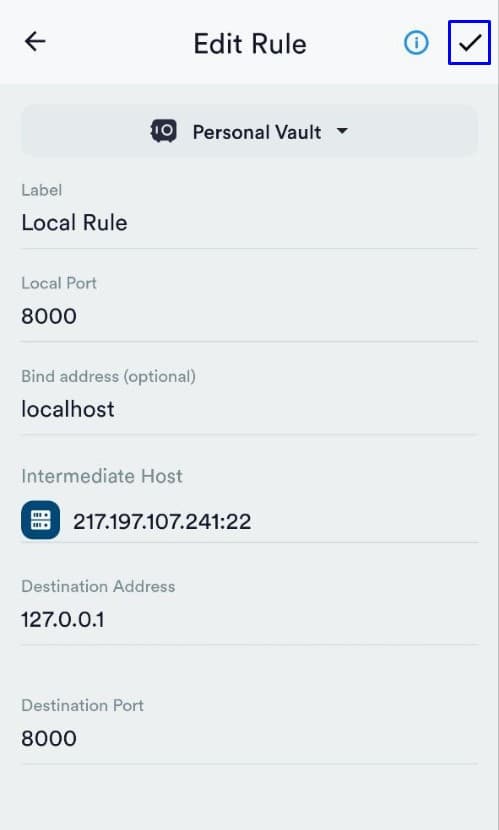
We set a name for this tunnel and click on the "Check mark" to save the settings:
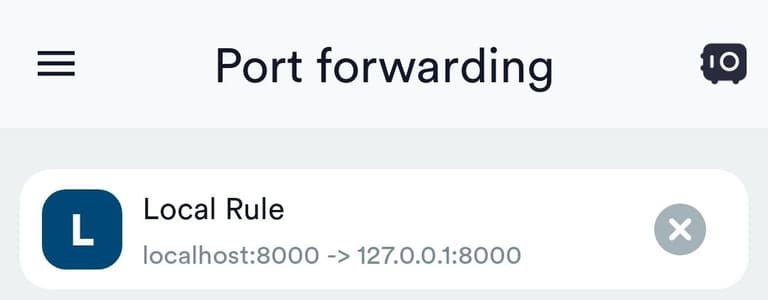
Activating the tunnel by clicking on this rule:
The panel should now be available in the browser via the link: http://127.0.0.1:8000/dashboard /
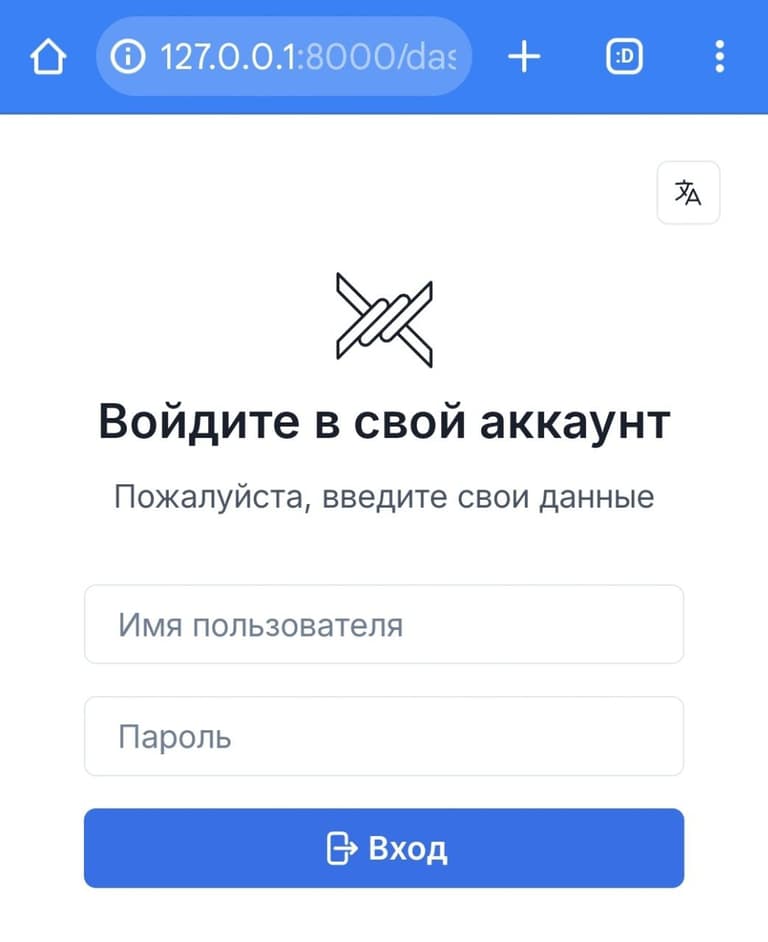
After logging in, we will see the main panel page
Then you can proceed to next step
Log in to the Marzban dashboard via HTTPS
To log in to the Marzban panel via a browser without configuring SSH Tunnels, you need:
- Purchase and link a domain name to a server with a Marzban dashboard (you can use your own domain name)
- Issue an SSL certificate for the domain name and specify the certificate in the configuration of the Marzban panel
You can quickly and easily purchase a domain on our website in a few minutes - https://my.aeza.net/order/domain
If the domain name already exists or was purchased elsewhere, ** you need to add an A record directed to the server with the Marzban panel**
A correctly added A record looks like this:
 After installing the A record, you must wait for the data to be updated on the global network:
This usually happens within 5-15 minutes, but sometimes it takes up to 24 hours to update DNS records.
After installing the A record, you must wait for the data to be updated on the global network:
This usually happens within 5-15 minutes, but sometimes it takes up to 24 hours to update DNS records.
You can check the update of data on the network in various services, for example: https://dnschecker.org
After the global domain name update, go to the server's SSH console and issue an SSL certificate using the script Acme.sh
Below are the step-by-step commands for obtaining an SSL certificate via Acme.sh :
apt install cron socatcurl https://get.acme.sh | sh -s email=youremailmkdir -p /var/lib/marzban/certs/In the command below, you must specify your used domain name after the -d parameter.
~/.acme.sh/acme.sh --set-default-ca --server letsencrypt --issue --standalone -d Your_name \
 --key-file /var/lib/marzban/certs/key.pem \
 --fullchain-file /var/lib/marzban/certs/fullchain.pem
After executing the commands, you will see a similar message about the successful certificate issue:

This certificate is valid for 3 months. To automatically renew it via cron, you need to leave port 80 open.
Open the panel configuration file through the nano editor and specify the paths to the SSL certificate.
nano /opt/marzban/.env
After making changes, we save the file using the keyboard shortcut Ctrl + O and pressing Enter and restart the panel with the command:
marzban restartAfter restarting, go to the browser via the link https://yourdomain:8000/dashboard and we observe the entrance window to the Marzban panel:
After logging in, we will see the main panel page:
Configure the VLESS TCP Reality protocol in the Marzban panel and create a user
For the high-quality operation of this protocol, it is necessary:
- Add the VLESS TCP Reality protocol to the Marzban panel
- Change Server Names (installed by default example.com )
- Change Dest (example.com:443 is set by default)
- Change the encryption key and shortIds parameter
- Fixing the Timeout error when connecting via the Hiddify app
- Creating a user
Further changes will be made in the settings, which are located in the upper right corner (settings sign)

Let's start by adding the VLESS TCP Reality protocol
Open these settings
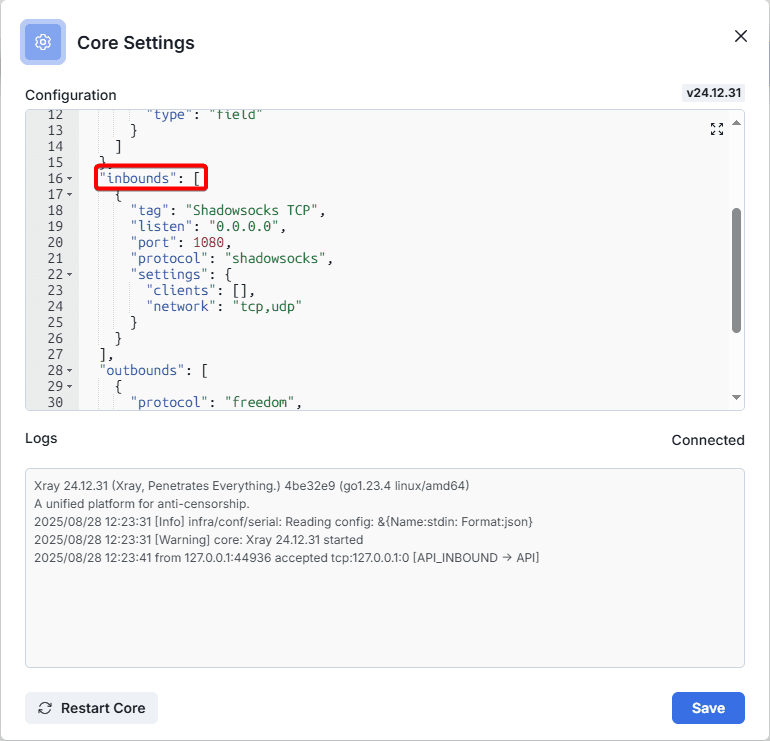
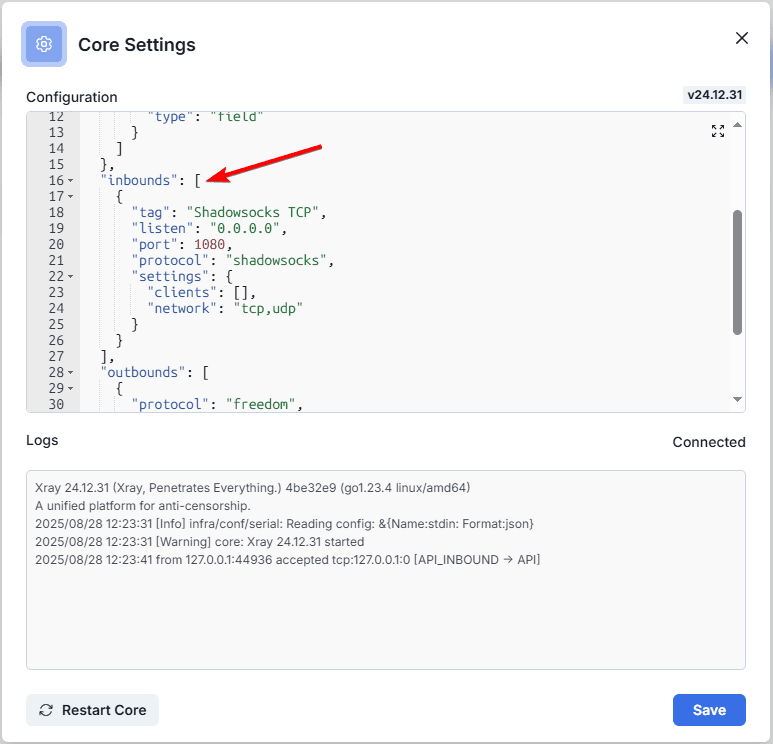
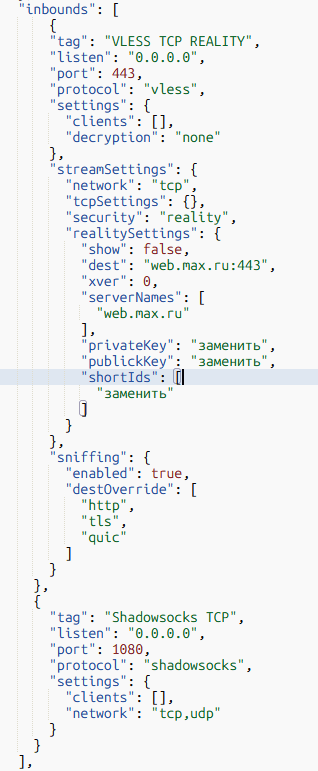
We observe that in the "Inbounds" block there are only TCP Shadowsocks, add VLESS TCP Reality to the beginning of the block after the square bracket
    {
      "tag": "VLESS TCP REALITY",
      "listen": "0.0.0.0",
      "port": 443,
      "protocol": "vless",
      "settings": {
        "clients": [],
        "decryption": "none"
      },
      "streamSettings": {
        "network": "tcp",
        "tcpSettings": {},
        "security": "reality",
        "realitySettings": {
          "show": false,
          "dest": "replace:443",
          "xver": 0,
          "serverNames": [
            "replace"
          ],
          "privateKey": "replace",
          "publickKey": "replace",
          "shortIds": [
            "replace"
          ]
        }
      },
      "sniffing": {
        "enabled": true,
        "destOverride": [
          "http",
          "tls",
          "quic"
        ]
      }
}, 
After adding the protocol, the configuration should look like this
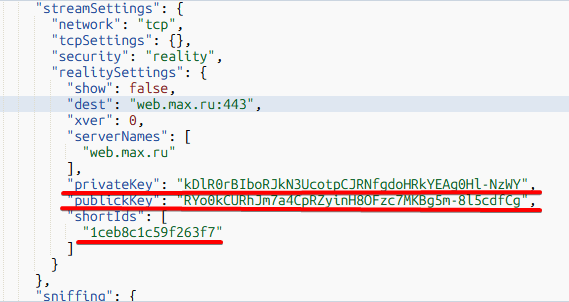
After adding the VLESS TCP Reality protocol, you need to change the values:
- ServerNames
- Dest
- Privatekey
- shortIds
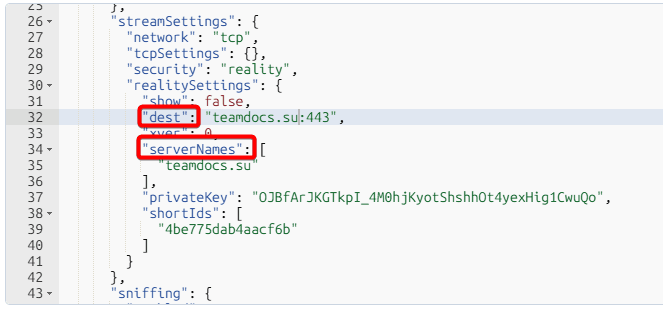
Let's change Server Name and Dest
We recommend selecting Server Name and Dest using the ping command
The lower the ping to a certain site, the lower the delay when the connection is working
It is necessary to choose reliable sites, if the site is unavailable, there will be no connection.
Be sure to choose unpopular but reliable sites as Server Name and Dest for your VLESS TCP Reality configuration.
Site requirements:
- TLS 1.3
- HTTP/2
- Should not be behind a CDN service
You can check ping with the command:
ping site -c 4If you haven't found a site suitable for these requirements, you can use the sites listed below:
Better suited for servers in Sweden and Finland:
teamdocs.suBetter suited for servers in Germany:
wikiportal.suBetter suited for servers in Moscow:
docscenter.su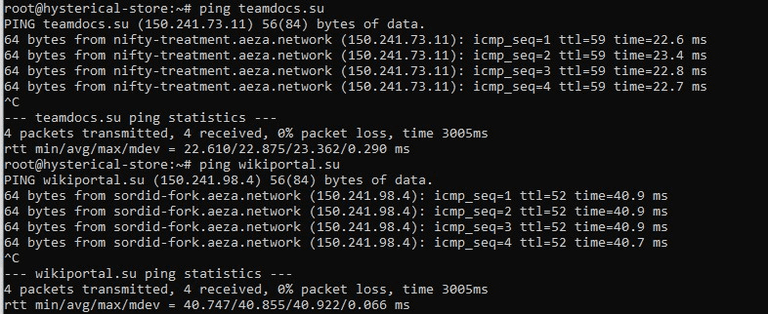
In this case, ping to the teamdocs.su site turned out to be the lowest, we will choose it as Server Name and Dest, specify them in these lines
Let's generate new encryption keys and the shortIds parameter in your server's command line with commands
docker exec marzban_marzban_1 xray x25519If an error occurred, try another command:
docker exec marzban-marzban-1 xray x25519shortIds can be generated using the following command:
openssl rand -hex 8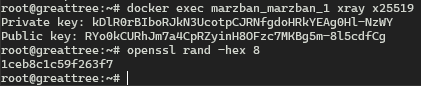
We need to copy the Private key and shortIds parameters and then replace them in the panel
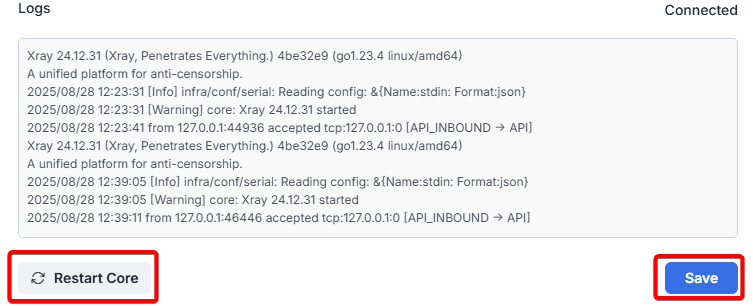
After making changes, you need to save the changes, restart the core and refresh the page in the browser
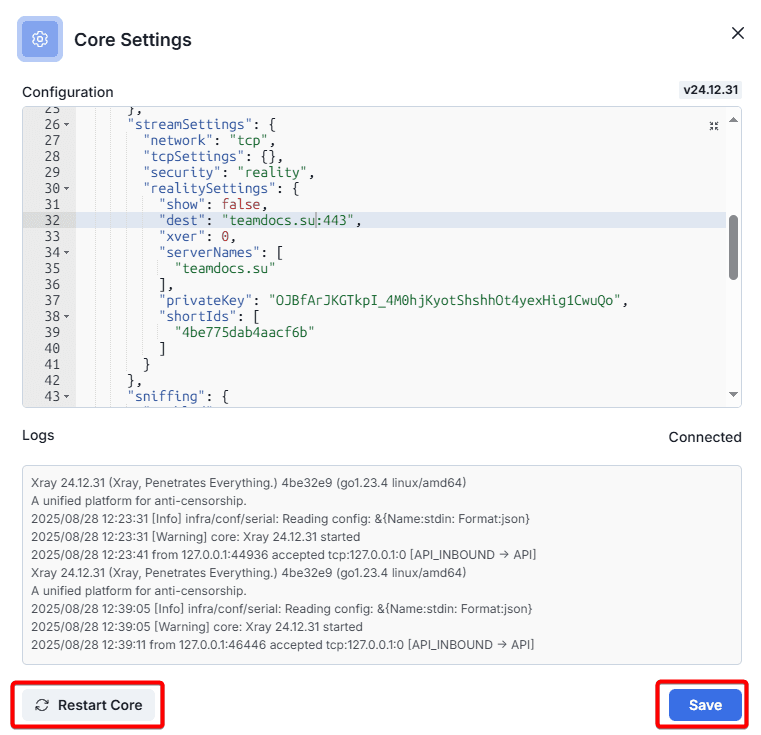
At this point, VLESS TCP Reality is configured.
Connecting the key in the VLESS client
You can learn about how to connect clients to your server in the following article: https://wiki.aeza.net/en/guides/setting-vless-clients/
Frequently Asked Questions (FAQ)
How to fix "Timeout" error in Hiddify?
Return to the panel configuration and find the "Routing" item
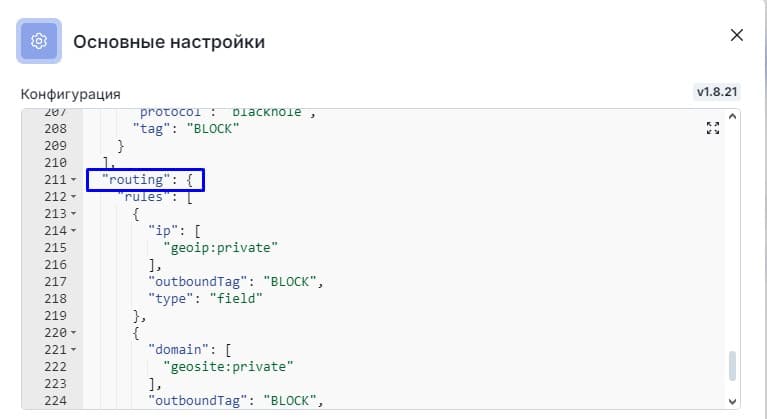
Insert the following rule at the very beginning of the rules block after the square bracket
      {
        "outboundTag": "DIRECT",
        "domain": [
          "full:cp.cloudflare.com",
          "domain:msftconnecttest.com",
          "domain:msftncsi.com",
          "domain:connectivitycheck.gstatic.com",
          "domain:captive.apple.com",
          "full:detectportal.firefox.com",
          "domain:networkcheck.kde.org",
          "full:*.gstatic.com"
        ],
        "type": "field"
      },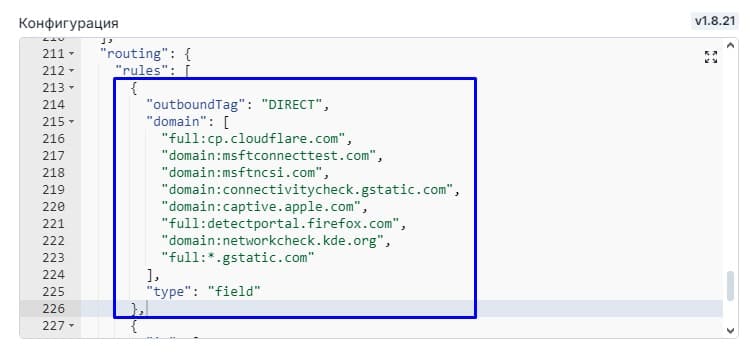
After making changes, you need to save them and restart the core
Done! The error should disappear.
How do I set up WARP proxying?
You can find instructions on how to do this here: https://wiki.aeza.net/en/guides/warp/